——
 —
home
—
bouncin' dog greetings
—
photo albums
—
odds & ends
——
—
home
—
bouncin' dog greetings
—
photo albums
—
odds & ends
——
hexaflexagon
When I was in elementary school, one of my TV favorite shows was
Mr. Wizard.
For some reason, his show on hexaflexagons stuck in my brain (as did the one on
Moebius strips).
In high school I found Martin Gardner who, in his "Mathematical Games" column in
Scientific American, wrote about them several times.
Every few years they pop up in my consciousness and I play with them again.
This time it was while working on placecards for a dinner party.
Being a firm believer in
anything worth doing is worth over-doing, I built a plan in Microsoft Publisher 98, and this is what you see.
Note: This page was created using Publisher's "Save as HTML" function, and may suffer from the conversion when displayed by your browser.
If you have Publisher, you can download the raw file (48K).
|
|
|
|
|
|
|
|
|
|
|
|
|
|
|
|
|
|
|
 |
|
|
|
|
|
Hexaflexagon
(also called a Trihexaflexagon)
|
|
|
|
|
 |
|
|
|
|
|
|
|
|
|
Construction
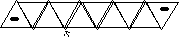
- Print this page.
Regular paper will work, but if you have card stock the final result is easier to flex.
- Cut out the paper strip.
Accuracy counts; use a metal ruler and razor knife if you can.
- Lightly score all of the lines with a bone knife.
A pen or pencil can be used instead.
- Crease each line forward and backward.
- Hold the paper with the Paste faces up.
|
|
|
|
|
|
|
 |
|
|
|
|
|
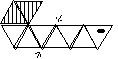
- Fold the left end under, on the line between the 3rd and 4th triangles from the left.
- Fold the right end over, on the line between the 4th and 5th triangles from the right.
You will have a hexagon with a triangle on top.
- Fold the triangle over.
A Paste face will show.
- Weave the Paste end under the other end.
The two Paste faces will be against each other.
- Glue the two Paste faces together, or better, use double-sided tape.
|
|
|
|
|
|
|
 |
|
|
|
|
 |
|
|
 |
|
|
|
|
|
|
 |
 |
|
|
|
|
|
|
|
|
|
|
Flexing
(Right-handed directions!)
|
|
|
|
|
|
|
|
|
|
|
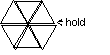
- Hold a point of the hexaflexagon between your right-hand thumb and forefinger.
- Follow the line from your right hand to the left side of the hexaflexagon.
- With your left hand, pinch downward and together the two triangles on either side of this line.
- Push the point you're holding in your right hand down and in.
You should now have a three-legged star.
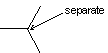
- At the center point, there should be three separate points.
Separate the points and lay them flat.
This exposes the second face.
Depending on how well you cut and folded, the edges may scrape against each other.
- Repeat for the third face.
And once more to return to the first face.
|
|
|
|
|
|
|
|
 |
|
|
|
|
|
 |
|
|
|
|
|
|
|
|
 |
|
|
|
|
|
|
|
|
|
|
|
|
 |
|
|
|
|
|
|
|
|
|
 |
|
|
|
|
|
|
|
|
|
|
|
|
 |
|
|
|
|
|
|
|
|
|
If you can't separate the points, pick a new starting point on either side of the one you just used and start over.
(In other words, rotate the hexaflexagon 60 degrees.)
You'll find that as you flex the hexaflexagon, it gets easier to pick a good starting point and the whole assembly flexes more smoothly.
|
|
|
|
|
|
|
|
|
|
|
|
|
|
|
Text and Microsoft® Publisher layout by Mike Carroll for Bouncin' Dog Greetings.
Placed into the public domain.
Please attribute!
Last updated 2001-02-25.
www.bouncindog.com
|
|
|
|
|
|
|
|
Copyright © 2001, cathy & mike carroll